


Содержание
Meta Trader 4 is a well-known and, one might say, cult trading platform, which is present at most Forex brokers. It allows not only to send orders to the broker but also to analyze the market and use trading advisors. In this article, we tell in detail what this terminal is and show its main functionality.
Getting Started with Meta Trader 4
Before you will start trading, you need to choose a broker. This article will show you how to install a trading terminal using Roboforex as an example. Now we will demonstrate what you need to do step by step to download and install the terminal on your device.
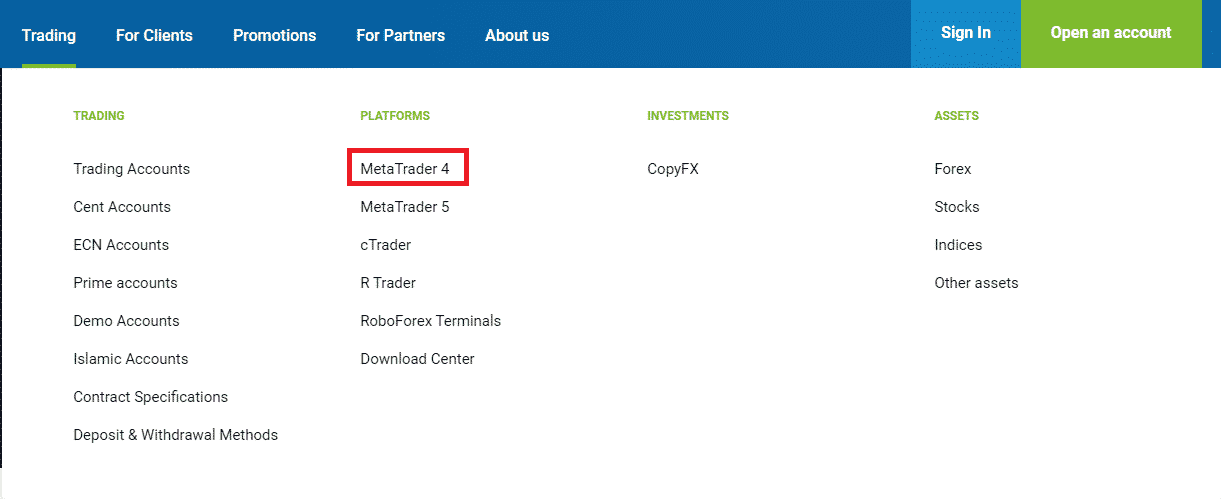
The first thing to do is to find a platform at the broker. Roboforex offers to read and download the famous trading terminal in the “Clients” section. In the drop-down menu, click on “MetaTrader 4 Platform” and go to the appropriate section.

Here you can get acquainted with the basic principles of the trading terminal, as well as learn more about its benefits. But most importantly, the platform itself is available for download, and on different devices. To download the trading terminal for desktops and laptops, you need to click on the button “Download MetaTrader4” or the appropriate icon on the right side of the button (in our case with the image of a computer).
Once you have done this, an automatic download will start. Once it is finished, open the installer file and follow the instructions.
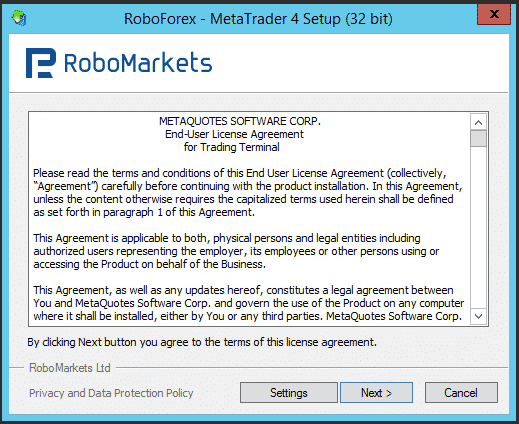
Before you start installing the terminal, you will be offered to read the license agreement of Metaquotes Software Corp. You can also choose the setup menu to customize the installation process.

Here you are prompted to select the folder to install, as well as to specify the path to the folder, for example, if you plan to install the terminal on another drive of the desktop computer. By default, the program will be installed on your system drive C, where the Program Files folder is located. Once you have made the necessary settings, click “Next” and the program will be installed on your hard drive. The installation procedure itself may take from a few seconds to a minute, depending on the speed of your PC and the loading of the latest update from the developer’s website.

After installation, it is necessary to open the application. A screen will appear with the possibility of selecting trading servers offered by the broker. The program automatically scans various servers and after the scanning is completed you will be able to start working.
The next step is to open an account. Roboforex broker offers its clients both practice demo accounts and real accounts.

To open a demo account, you must enter your personal details. In particular, you will be required to provide:
- Name.
- Email address.
- Provide a cell phone number.
- Choose an account type.
- Set the size of the deposit, as well as the leverage.
Next, you can check the “I agree to subscribe to your newsletters” box. In this case, you will receive a newsletter about the company’s work to the e-mail address you specified. Finally, click “Next” to complete the demo account creation procedure.
Not every broker allows you to open a demo account directly from the terminal, sometimes you need to register completely through the company website and open an account through a personal cabinet.
The process of opening a live account on the Metatrader 4 platform from Roboforex is slightly different from creating a demo account. Here you need to specify the following data:
- Name.
- Country.
- Region.
- City.
- Postal Code.
- Full address.
- Phone number.
- Email address.
- Choose an account type.
- Set the size of the deposit, as well as the leverage.
Next, if you want to receive newsletters by e-mail, you can check the box “I agree to subscribe to your newsletters”. To complete the account registration procedure, click the “Next” button.
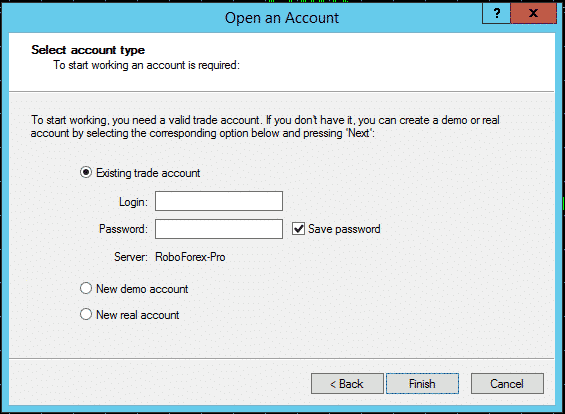
You can also open a trading account directly on the broker’s website. And after installing and opening the MT4 terminal, enter the login and password. If you want your password to be saved in the system, you can mark the appropriate field. But for more safety, it is recommended to enter the password each time yourself. After entering the registration information, click on the button “Finish”.
Basic settings of the trading terminal. The first look at the platform

After launching the terminal, the first thing you will see are four windows with charts of the most popular currency pairs:

Some people are comfortable with this format, while others will want to change it. The first thing you can do is to expand the window of one graph to the whole screen. To do this, use the appropriate button at the top of each graph.
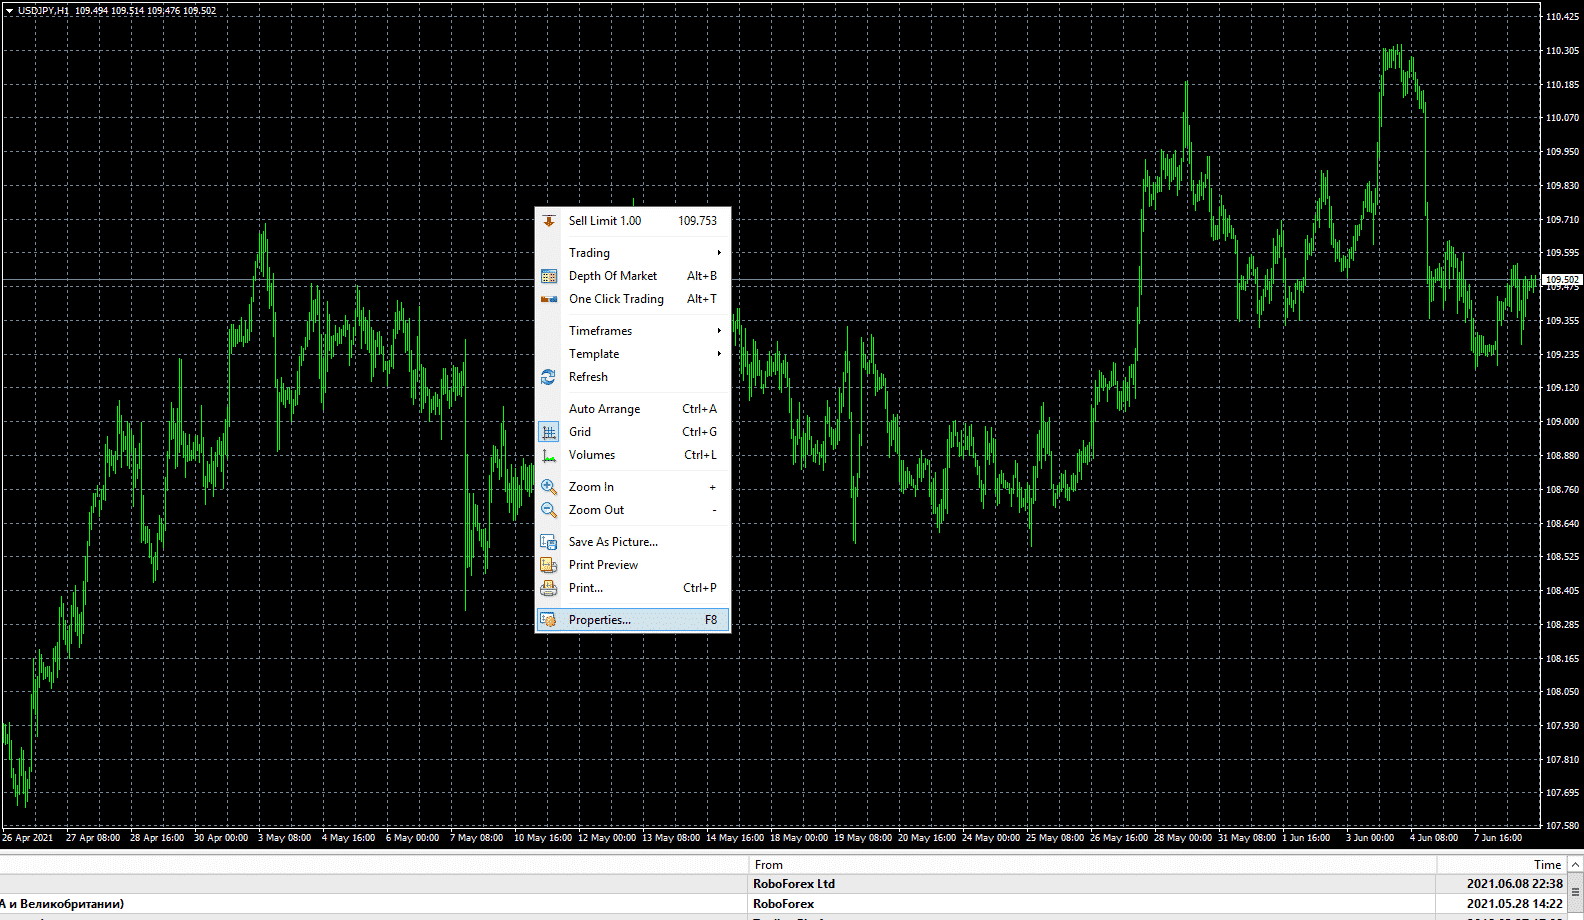
The default color scheme in the platform is black and green. If you are not agree with it, you can immediately make your own adjustments. To do this, right-click on the screen with the graph and select “Properties” from the drop-down list.
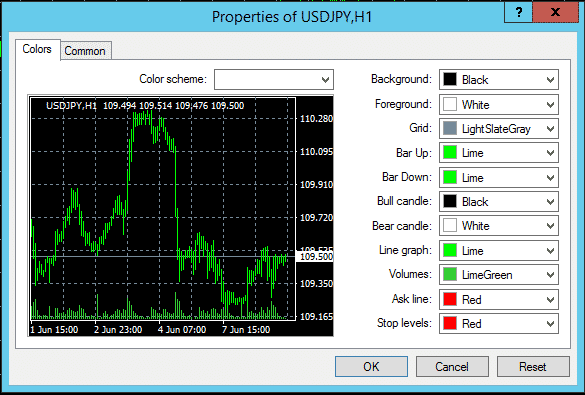
The graph visual settings panel will appear on the screen. There are two main sections here – “Colors” and “Common”. In the first section, you can change the color scheme of the graph. In particular, here you can change the background (for example, make it white), as well as the colors of lines, volumes, stop-loss levels, bars, grid, and text. At the top, there are preset color schemes that you can choose as an alternative to the basic one.
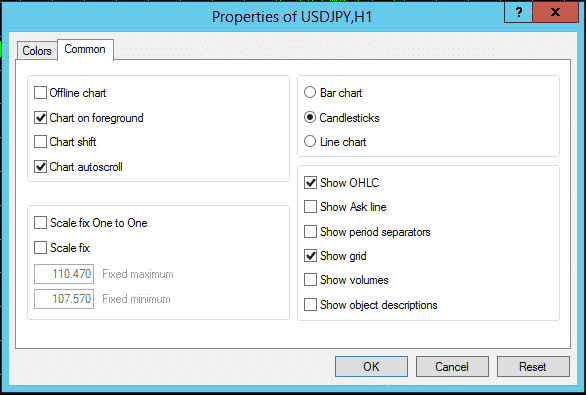
Now let’s take a closer look at the settings in the “Common” section. There are several sections here. You can set the chart on top (in the foreground), offset quotes relative to the right edge of the screen, auto-scrolling the chart to the current time, and offline chart. Also, a fixed scale option is available to the trader, which can be customized for technical analysis. Metatrader 4 offers three types of chart display – candlesticks, bars, and the line. Beginners are recommended to work with candlesticks, they are the easiest way to understand the price movement.
You can also download our Script to change the template of your chart
Of the additional options can be noted:
- Demonstration of opening, closing, high, low levels in the upper left corner of the screen.
- The Ask price line over the Bid price, by which the graph is built
- Period separators are a very useful option because it allows you to see the period on the chart, the time of the rollover.
- The grid on the whole chart will probably be useful for beginners.
- Volumes at the bottom of the chart, if you need their data.
- Descriptions of graphic objects.
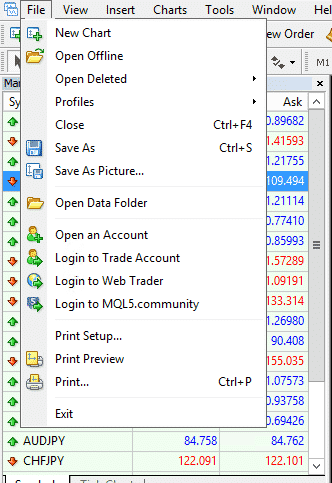
First, let’s look at the “File” section. It offers general settings that allow you to organize the work of the platform. So, using the items in the “File” section, you can do the following operations:
- Set a new chart. Here you can choose from all the trading instruments available at the broker.
- Open offline. With this function, you can open offline charts whose quotes will not be updated. For example, our indicator Chart Period Converter creates charts for non-standard timeframes: M2, H5, and D2 and uses them offline.
- Open Deleted. Shows recently closed charts. With this option, you can restore and open them.
- Profiles. Here you can open preset profiles with charts (e.g. with predefined pairs and indicators), as well as save your current profiles for later loading. Profiles are necessary for you to save all your open charts in case the terminal settings get messed up. You can save your color scheme as well as installed indicators and advisors to your profile. We recommend you save your main profile once under a unique name, and a second one under the name “Default”, which will be automatically loaded when you start the terminal. Profiles can also be manually copied from different terminals.
- Close. Allows you to close the current chart. You can also use the Ctrl+F4 hotkey combination to do this.
- Save As and Save As Picture. You can save the quotes of your current chart in .csv format or make a screenshot of it using the platform.
- Open Data Folder. This important section gives you access to the platform folder. This is where all indicators, scripts, advisors, profiles, and set files are stored, which you can use by default. By the way, you will also add your own indicators, advisors, or scripts that you will need in trading to this same folder.
- Open an account. There are several options here. You can create a new account, connect to an existing account, or log in to the platform.
- Print preview. Charts from Metatrader 4 can be printed on paper. All necessary options are available for this.
- Exit. Closing the terminal.
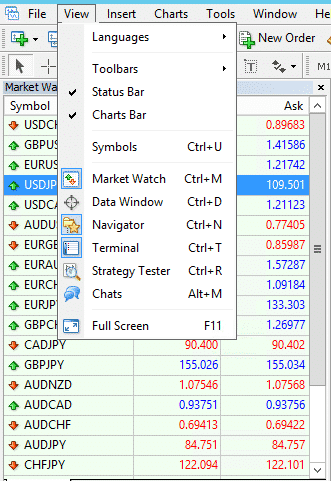
The “View” section offers several very useful options. Through this menu, you can open/close additional windows, such as market overview window, data window, strategy tester, terminal. Customize the toolbar by removing unnecessary buttons. In addition, here you can change the language of the terminal.

The “Insert” section offers you to add various tools to the chart. Here you will find all the indicators, as well as graphic analytical elements that you can set to predict the price. A little later we will consider the basic settings on the example of each instrument. By the way, this section has options to add text and text labels to the chart. This is necessary when you want to comment on this or that market situation, to make a necessary note.
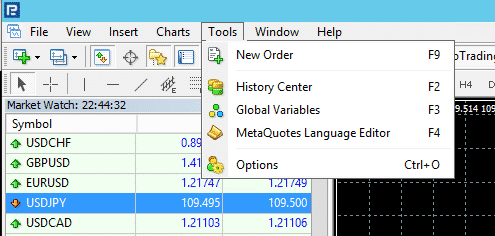
The “Tools” section offers the opportunity:
- Opens a new order on the current symbol.
- Download archive of quotes for testing of Expert Advisors and indicators with the quality of quotes of 90%.
- View the global variables left by the Expert Advisor and delete them if necessary.
- Meta Quotes Language Editor (MQL) for edit program code.
- Access to the general settings of the terminal, which consist of 11 tabs:

-
- Server – alternative menu for connecting to a trading account and additional settings.
- Charts – the ability to set the number of bars loaded on the chart, display the Ask line, period separator etc.
- Objects – settings for working with graphical figures and text.
- Trade – you can configure the default symbol, allow one-click trading in the Terminal window.
- Expert Advisors – the menu is needed to allow robot-advisors to trade in your account, use .dll files programs, as well as import data from the Internet.
- Notifications – allow sending push notifications to your phone using your MQL5 account ID. This option is required if the program you are using allows sending this data.
- Email – here you can configure the messages from the Expert Advisor or indicator directly to your email through the SMTP protocol.
- FTP – through this setting, you can transfer data to different FTP servers, for example, trade data to create your trade monitoring on the MyFxBook site.
- Events – sound accompaniment of trading. You can change the signals or turn them off altogether.
- Community – the ability to log into your MQL5 account to make purchases and read personal messages directly from the terminal.
- Signals – this tab is intended for setting up auto-follow, copying signals from the MQL5 website.

In the “Window” section, you can customize the layout of the charts to your liking. For example, at the beginning of your introduction to the platform, you are offered four asset charts, arranged in a tile. In addition, you can arrange the charts vertically, horizontally, and cascade, as well as add a new window.
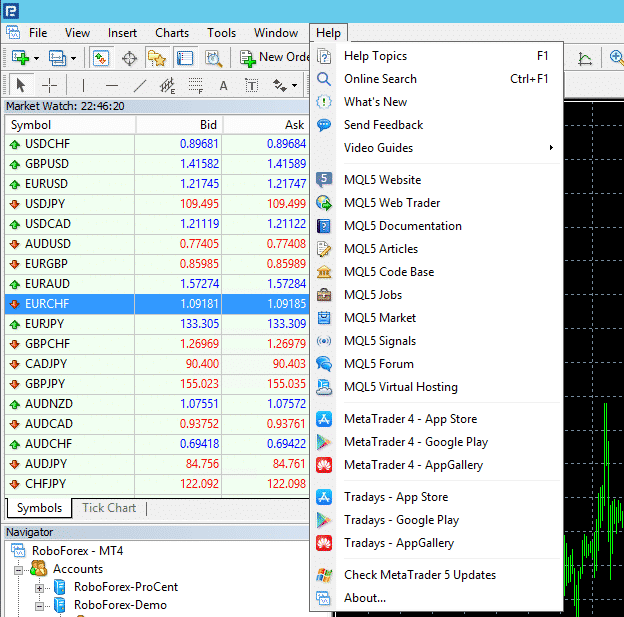
The “Help” section offers various guides on the platform, as well as useful links to sites related to the Meta Trader 4 trading terminal. In the “About” section you can find out the current version of the terminal.
Setting a new chart
By clicking on the icon in the working menu of the platform, you can set the chart of any asset that you plan to trade or that you want to analyze.

By default, the main currency pairs are offered. And if you need more, you can right-click on the window and select “Symbols”. All currency pairs available at the broker will open.
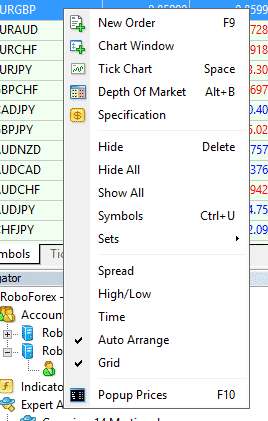
You can also add a chart from the ticker window on the left side of the platform’s screen. To do this, right-click on the desired ticker and select “Chart Window”. Besides this option, other interesting settings are available in this menu. For example, from here you can go to the order window, select the Ticker chart, access the Depth of Market, find out the specification of the asset. Here you can also get all the information about the spread, maximum and minimum prices, and time. By clicking on “Symbols” you will be able to add and remove the necessary pairs for the Market Watch window.
Sending orders to a broker. How to open a deal in Meta Trader 4

Now let’s look at opening orders on the Meta Trader 4 trading platform. To do this, you can click the “New Order” button on the main toolbar of the terminal. As we mentioned above, you can also send an order to the broker through the ticker window.
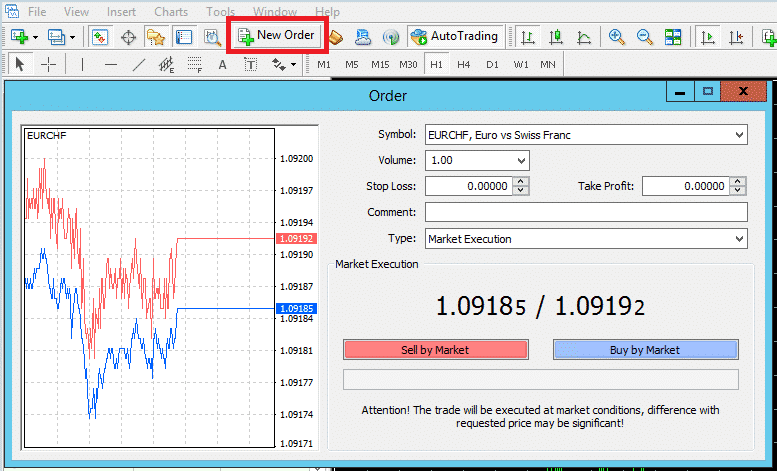
The screen that appears is divided into two parts. On the left you can see a tick chart for the selected asset with Bid and Ask prices. On the right is the work area where you will open a position. It includes:

- Symbol. Even if you have selected a particular currency pair on the chart or its ticker, you can always change the instrument in this section. All available assets will appear in the drop-down menu.
- Volume. Measured in lots. It is 1.00 lot by default. But you can open trades with smaller volume, depending on the step set at the broker.
- Stop Loss and Take Profit. These are special types of pending orders, which allow partially automate trading. Stop Loss is designed to automatically close the position when the set level of loss is reached. Take Profit has a mirror function. The deal will be closed when the set profit level is reached.
- Comment. You can leave a note for an open order. Also, comments are often used by Expert Advisors for subsequent analysis of a group of orders on them.
- Type. Two options are available here – Market Execution and Pending Order. The first involves opening a deal at the current market price now. The second is to open a position at the price you set. In the menu of the pending order, some options are also available. Here you can select the type of such an order, as well as set the price at which the order should be executed. Also, you can set the time when this order will be automatically deleted in case it does not work.
- Sell by Market/Buy by Market. The first type of order is a market sale. That is, you want to sell at the current market price. The second type of order – buy on the market, that is, you open a deal to buy at the current market price.
Indicators in the terminal
Now let’s see how the indicators are installed and configured. Press the “Insert” menu

The Meta Trader 4 platform offers by default the most popular technical analysis tools in sections such as trend indicators, oscillators, volume indicators, Bill Williams indicators. You can also install your own indicators that you create or download from the Internet.
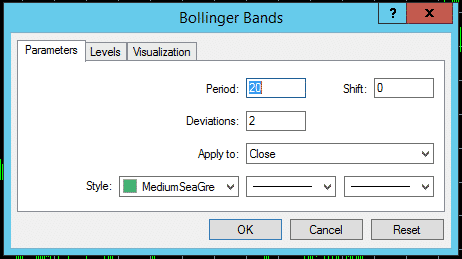
Let’s take a look at the indicator settings window based on the popular analytical tool Bollinger Bands. So, there are several sections here:
- Parameters. Here you can set the indicator period, shift, deviation, application to price (in the example it is the Close price), as well as the color scheme, line thickness.
- In the “Levels” section, you can add certain marks to the chart and color code them.
- “Visualization” offers to set the indicator on certain timeframes or on all available time scales on the chart.
Now let’s see how to add other indicators to the terminal. To do this, you can use the “Open Data Folder” from the “File” menu. In the window that appears select MQL4 and find the Indicators folder inside this folder. This is the folder you should move your downloaded or created algorithm into. After that, reload the platform (or update the required folder in the Navigator window by pressing the right mouse button and selecting – update in the drop-down menu) and look for an indicator from the list. You can also select it in the “Custom” section of the “Insert” => “Indicators” menu.
In the same way, you can install additional Expert Advisors and scripts on the platform. Instead of the Indicators folder, to install a robot, you must load it into the Experts or Scripts folder. Next, reload the platform and find the Expert Advisor.
All available programs are also listed in the “Navigator” window, which can be opened in the “View” menu.
Graphic tools
Using the standard channel as an example, let’s look at the basic settings you can use when installing graphic tools.
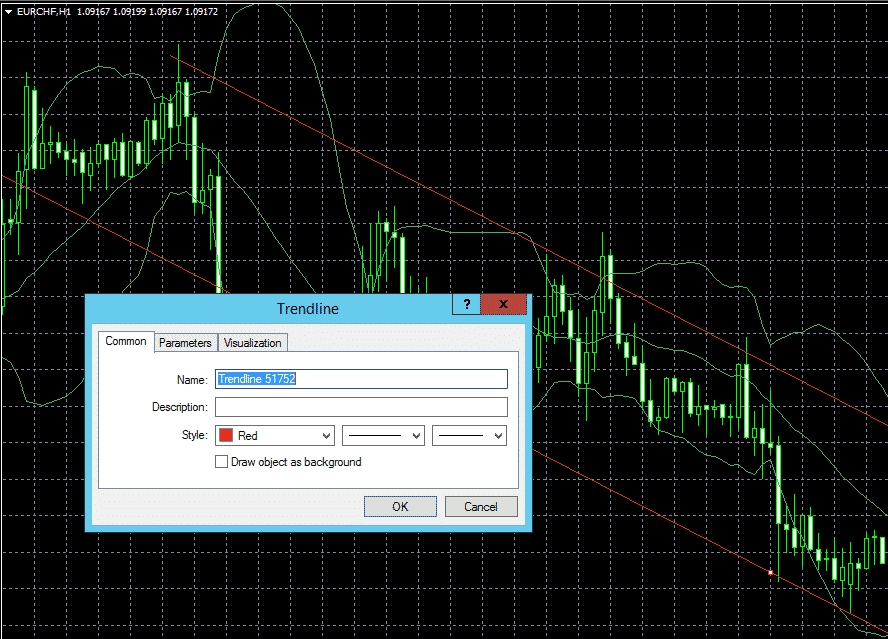
To access such options, you need to display the channel (or any other graphical tool), select it with a double-click, and right-click on it. After that, select the tool property and you will see the same window as on the screenshot.
Overview of “Terminal” window
The default “Terminal” window is located at the bottom of the chart. It has several sections, which we will now consider in more detail. The first one is “Trade”. All data on your trading activity is presented here, all market and pending orders, current balance, funds, and margin are reflected.

When an order is open, it will also display the trade type (Buy or Sell), open time, volume, symbol, stop loss and take profit levels, commission, swap size, and profit, as well as comments.
In the “Account History” section” you can trace all opened deals ever on your trading account, deleted pending orders, as well as information on balance changes. It should be noted that this information is used to monitor the account, for example, at the most popular service Myfxbook. It should be noted that some brokers for some account types (as a rule cent accounts) do not keep this history for a long time and delete it at the expiration of time. Thus, if the trader initially did not monitor his account, it will be impossible to confirm the early trading history.
The “News” section is designed especially for those who trade with the help of fundamental analysis or prefer news trading. It broadcasts news from the main suppliers that the broker works with.
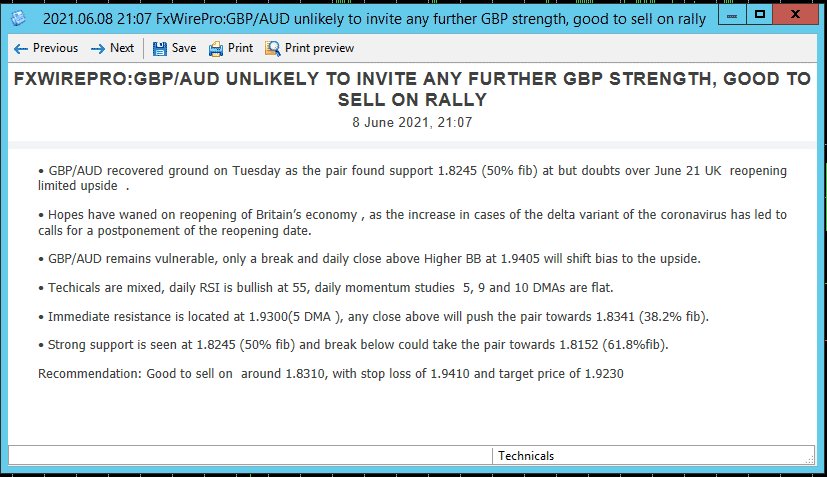
When you double-click on any news item, you open a special window in which you find the news itself, as well as comments. Here you can switch between news items, save the information and print it out.
The “Alerts” section is very useful for all categories of traders. Here you can set your own alerts, which will be triggered under certain conditions. It’s easy enough to set up an alert.
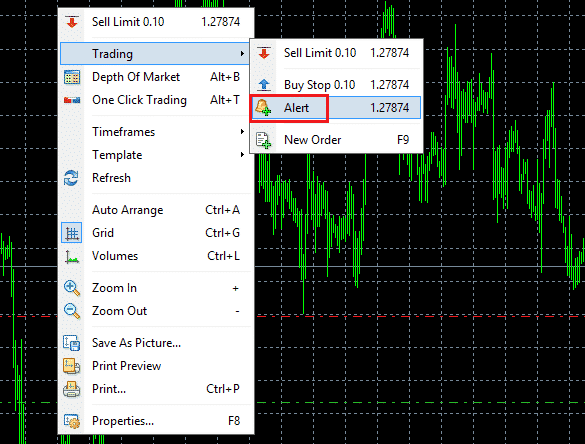
To do this, right-click on the chart, select “Trade” and select “Alert”.
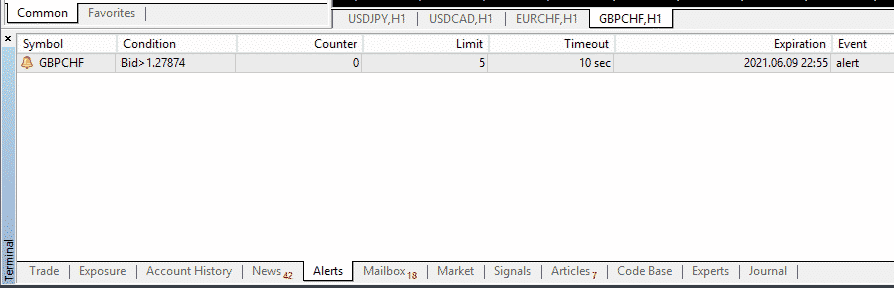
At the level on which you right-clicked, an alert will be created. In the window at the bottom of the chart, you will see its description. For example, in our case, the alert was created on the GBPCHF currency pair with the Bid condition more than 1.27874. If you want to change an alert, right-click on it and select “Change”. You can set as many alerts as you want for any currency pair. The convenience is that every time the price or time reaches the alert conditions, you will be notified by the platform and you will be able to make a quick decision.
You can also check our Price Notification Indicator to make your own alerts.
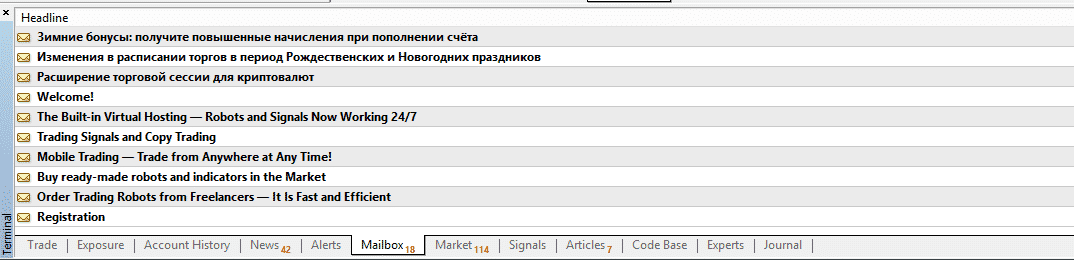
In the “Mailbox” section, you will see all messages and letters sent to you by the broker. For example, you will receive a notification about creating a trading account, as well as a welcome letter from the company. Letters with changes in trading conditions if any and many other things will also appear here. We recommend you not to ignore this section and check it from time to time, especially before holidays and possible changes in trading sessions.
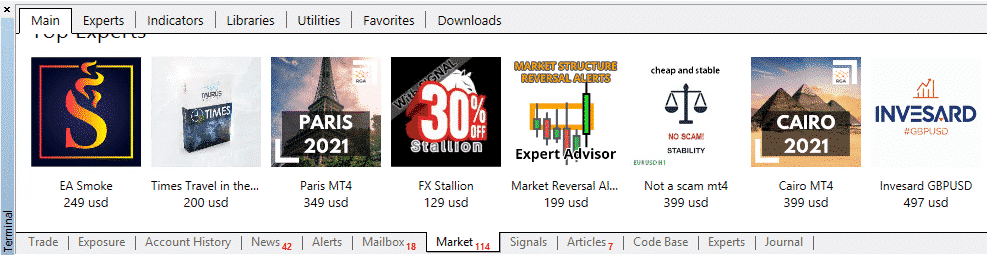
The “Market” section offers an internal marketplace where you can buy an indicator, Expert Advisor or script without leaving the platform. The names of the products are listed here, as well as the price of the product.

The “Signals” section offers the opportunity to analyze and connect to a particular signal system offered within the platform.

Let’s take a closer look at this section. We have chosen the very first signal provider from the list. A wide range of information on the provider is offered here.
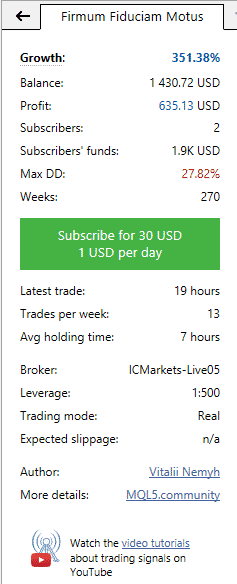
On the left side, there is general information on the signal provider. Here you can see the profit, the number of subscribers, the maximum level of drawdown, the number of trading weeks, the broker with which the signal provider works.

The center section shows the vendor chart, as well as additional information on the account.
The “Articles” section contains useful materials on working with the platform, as well as on trading on mql5.com in general. To see the article you are interested in, just click on it twice with your mouse. It will open in your default browser.

In the “Articles” you will find many useful articles on various trading instruments. And there is a rating that allows you to choose the most popular materials prepared by traders.
The “Experts” section offers comprehensive information on the Expert Advisors you use. Here you can see the connection history of the trading robot, as well as see the settings with which it works.
The “Journal” records the entire history of your interaction with the platform. This is a very useful function, because it allows you to see exactly what you were doing at any given moment, whether you opened a position, what orders you placed, and so on. The log “communicates” directly with the broker’s server.
Testing of Expert Advisors and Indicators

Metatrader 4 is not just a trading platform. It is, in fact, a ready-made tool for full-fledged work, including the application of algotrading. It offers a special tester of trading robots and indicators, a function that is very useful when working with algorithms. Testing takes place in a separate window “Tester”.

Expert Advisor Options
For testing, you can select only those Expert Advisors that are already loaded into the platform. To do this, they must be in the Experts folder (following the example of indicators we discussed above). With the selected Expert Advisor you need to make additional settings. To do this, click on the “Expert properties” button on the right side of the testing window.
Three tabs will be available here:
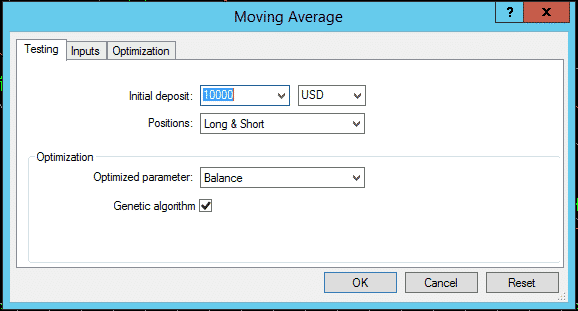
- Testing. Here you can set general parameters for the tests. These include, for example, the currency of the initial deposit and volume. The Expert Advisor will work with the amount you set. By default, 10,000 is specified. In addition, here you can select the types of orders with which the Expert Advisor will work. Three types are available – Long & Short, Only Long, Only Short. In the first case we are talking about opening trades for buying and selling, in the second case only buying, and in the third case only selling. The Genetic Algorithm checkbox allows accelerating the optimization of the Expert Advisor many times without distorting the test results. The most important parameter to be optimized is selected here, which the genetic algorithm will strive for, as well as the report on the results of optimization will be based on.
- Input parameters. This tab contains a list of all input parameters for the Expert Advisor. They affect the operation of the Expert Advisor and can be changed here. In this case, it is not necessary to change anything in the code of the Expert Advisor itself. This list may look different depending on what settings the author has put in the Expert Advisor.
- Optimization. This tab allows you to interrupt individual passes during optimization if the limits specified in these settings will be reached. For example, if the balance during optimization is $1000, but the results of the current test are negative, then as soon as the balance reaches $200 – this pass is interrupted and the program passes to testing the next parameters. These settings are not required, but allow you to speed up the optimization process.
Other testing parameters
It is not enough to select and configure an Expert Advisor to start running tests. It is also necessary to specify a number of other parameters, such as financial instrument and period. To do this, you can select one of the available assets in the terminal or use custom quotes. In this case, the test uses historical data on currency pairs, which can be found in the /history folder of the trading terminal.

To define a financial instrument, click in the “Symbol” field, and to define a timeframe, click in the “Period” field. And if there is no data file for a particular trading instrument or timeframe, it will be created automatically by loading broker quotes. You can also load quotes manually, using the menu “Tools” – History Center. But remember that the quality of broker quotes is 90%. In the following lessons, we will tell you how to achieve 99% quality.
There are several testing methods offered in the Metatrader 4 platform:
- Opening prices. This is a fast method that tests the robot on formed candles. Some Expert Advisors implement a principle that does not depend on intra candlestick modeling and works on already formed candlesticks. The end of the formation of the previous bar can be tracked by the appearance of the subsequent bar. This mode is used for consecutive modeling of bars starting from the open price, then the maximum, minimum, and close price. This is the fastest and most inaccurate method of testing.
- Control points. In this testing method, the closest smaller TF is used. This method is used for the approximate estimation of an EA that trades by intra-trading. This method requires downloading historical data.
- All ticks. This method implies the most accurate modeling of price movement within a candle. It uses the price movement data for each tick, which is stored in the quotation history.

In the “Report” window you can look at the quality of the simulation (in our case it is 90%). For this purpose, you can use a special color bar. It can be of three colors:
- Gray. This part has fallen out of testing. This color can appear, for example, if the date range for the test was not specified.
- Red. The simulation was not carried out in this area, since there was no data on the low timeframe.
- Green. The simulation was carried out in full. And the more saturated is the color, the better is the quality of the simulation. For example, when testing on the timeframe H1, a dark green band can mean that modeling was performed on the half-hour timeframe, while bright green can mean that testing was performed on all possible timeframes, including M1, or on the previously downloaded quotes for this timeframe.
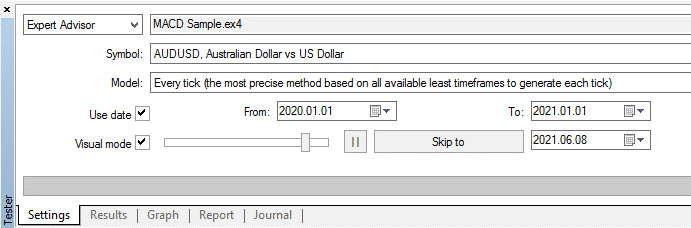
The choice of time range allows you to test the Expert Advisor on certain periods. This approach is useful when you want to see the performance of the Expert Advisor at certain moments, for example, when important economic statistics are released and the volatility on the markets rises sharply, as well as on the last month, half-year or year.
To enable the date restriction, you must check the box next to “Use date” and define a range in the “From” and “To” fields. After you have completed the settings, you can enable the “Start” button and start testing.
The visualization of testing is also available. If you set this item, after pressing the “Start” button, a chart will open with the visual in brackets, on which you can see the sequence of price movements on the quotes history. You can regulate the speed of playback by yourself using a special slider. Also, you can manually control the appearance of quotes on the chart, to do this you need to put a pause and sequentially press the F12 key.
Extending the capabilities of the Meta Trader 4 terminal tester
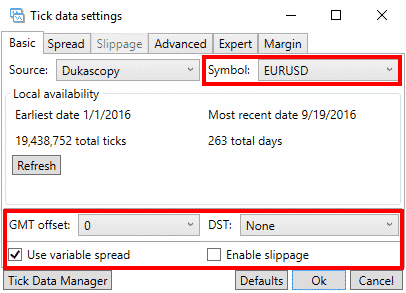
Quotes used in the standard Meta Trader 4 terminal are not of the best quality. Moreover, you can test and optimize only the static spread and custom settings of quotes and execution. A special Tick Data Suite (TDS) software, which is installed as an add-on to the MetaTrader 4 platform, helps to correct this problem.
The main advantages of testing with TDS:
- Real spread embedded in the quote file
- Selecting the quotes history of different brokers with high quality
- Slippage simulation
- Advanced order execution settings
This truly powerful tool allows you to take testing and optimization of Expert Advisors to a whole new level. The testing result becomes equal to 99%.
Conclusion

In this article, we looked at the basic functionality of the Meta Trader 4 platform. As you can see, the trading terminal offers a very wide range of opportunities in terms of trading, as well as analysis and the use of third-party libraries. The trading platform allows to work with Expert Advisors, optimize and test their work on quotes history. In the next lessons, we will tell about how to increase the speed of the terminal, how to optimize trading with Expert Advisors, how to start trading with Expert Advisors, and another no less important information.


